Showing posts with label apple. Show all posts

Sunday, October 2, 2011

Apples to apples


I suffered one of life's disappointments this past week.  One of those that makes you question your confidence and competence.  So what did I do?  Turned to the pots, pans, and a stick of butter for solace (after assuring my mother that I find no comfort at the bottom of a bottle...)

The harvest season is most definitely upon us.  The weather let up by giving us some nice temperatures this weekend, but there's no turning the leaves back to green.  Speaking of, my coworker's apple tree seems to have produced a bumper crop of tiny, tart little apples that she brought to work to share.

So cute and little!!  Maybe 5 cm in diameter, at best.
I had tempted poor Hubs with the idea of an apple pancake yesterday, but wound up feeling too tired and out of sorts to pull it off (instead, we grabbed stuff from 7-Eleven on our walk back from my dentist appointment, and he had his first Winnipeg Slurpee!  A milestone!!)  I felt it would be cruel to not deliver the promised pancake today.  I decided to get a little fancier than usual, though.  Typically I just chop up apples and mix the pieces into typical pancake batter.  Today, I decided to recreate a tasty treat I tried at the famous Pancake House chain... the German apple pancake.

Apples cooking in caramelized spiced sugar and butter.
One big pancake for two, comin' up!  It's an 11" pan, to give you a frame of reference.
Close up goodness- crispy-but-fluffy batter, soft apples, and lots of sugar, spice and all things nice.  I know, I'm terrible.
It's basically a pancake started by cooking apples in butter, sugar, cinnamon, and nutmeg on the stovetop (how can you go wrong?!), adding a rather eggy, runny batter, and baking in a hot oven.  A bit more prep time than what my usual apple pancakes require, but SO worth it in the end.  Allrecipes.com has become one of my new best friends for inspiration, and they didn't let me down here!  Plus, it gave me an excuse to test-drive my new ovenproof skillet.  And I didn't burn my hands once!  Hurray!

Yes, I use President's Choice 15% real maple syrup table syrup.  Sorry for all you out there who think Canadians drink maple syrup by the litre... but I find the commercial varieties, while delicious, to be too runny (and too expensive) for my liking.  This is the best of both worlds for me.  Don't judge.
The next order of business was to use up some apples that have languished in my crisper for too long to be eaten out of hand.  They were Royal Galas, which my chem teacher once referred to as, "The dessert apple".  How could I interfere with that destiny??  Plus, I had yet to use my fluted tart pan for an actual tart (I've used it for something else, but I'll post that another time).


My other new friend in the online recipe world is joyofbaking.com.  Now, I don't consider myself a beginner when it comes to baking, but there's something reassuring about seeing a recipe with an accompanying how-to video.  Sort of makes the whole process seem idiot-proof.  That was the case for this cream cheese apple tart with a shortbread crust base.  I wanted something to accompany the pumpkin pie ice cream I whipped up at Hubs' behest (recipe pending!)  How often does that happen?  Requesting an ice cream, then making the dessert to match it?


Please excuse my messy stovetop.  It's clean now, I promise!
Overall, I'd say both of these were a success.  I thought Hubs might enjoy the cheesecake-like filling for the tart; turns out I was right.  It was a great dessert to finish of a meal with our dear friend Deb while watching Netflix and drinking more wine than is probably recommended on a "work night".  Oops.

Planning to extend the harvest baking theme to a pumpkin-fest for next weekend (Canadian Thanksgiving, yay!),
-Honeybee

Monday, February 21, 2011

Muffin Mania!


My muffin pan has gotten a good workout lately.  Whenever I'm feeling like I need a little pick-me-up, out comes the dozen-cupped baking vessel.  In the past few weeks, I've re-made some favourites of mine: pumpkin muffins and berry bran muffins.  I tweaked them both a little bit this time around... details below!


Pumpkin Muffins
Adapted from "Muffin Mania" by Cathy Prange and Joan Pauli
  • 4 eggs
  • 2 cups white sugar
  • 1 cup oil
  • 1/2 cup orange juice
  • 1 3/4 cup pumpkin (small can)
  • 1 1/2 cups all purpose flour
  • 1 1/2 cups whole wheat flour
  • 1 tbsp cinnamon
  • 2 tsp baking powder
  • 1 tsp salt
  • 2 cup raisins
  1. Beat eggs slightly. Add sugar, oil, pumpkin and beat thoroughly.
  2. Add dry ingredients and mix until smooth. Stir in raisins.
  3. Fill greased muffin cups 2/3 full.Bake at 375° for 15-20 minutes.
Mmm, nice and moist.  They didn't suffer at all from cutting down on the oil content.  Plus, I feel a little bit better having subbed in some whole wheat flour.

This next recipe comes from my dear friend Andrea.  I'll give you the original instructions below, then let you know what's going on with that ooey gooey goodness (see above) afterwards:

Berry Bran Muffins
From Andrea… not sure of her original source


Makes 9-12 muffins, depending on how you fill the tins
  • 1 egg
  • 1/2 cup milk
  • 1/4 cup canola oil
  • 1/2 cup wheat bran (you can also use All Bran)
  • 1 cup flour
  • 1/2 cup sugar
  • 2 tsp baking powder
  • 1/2 tsp salt
  • 3/4 cup of frozen or 1 cup of fresh berries
  1. Mix together the egg, milk, and oil.  Stir in the wheat bran and let sit five minutes.
  2. Stir together the flour, sugar, baking powder, and salt in a separate bowl.
  3. Combine wet and dry ingredients until just moistened. Stir in berries.
  4. Spoon into greased muffin tin (or cupcake wrappers). 
  5. Bake at 400ºF for 20 minutes. 

My modification: À la Tim Hortons "Fruit explosion" muffins, I substituted some peeled, chopped apple for some of the berries, and added a small dollop of PC Blue Menu raspberry jam on top of the raw batter just before putting them in the oven.  No more messing around with the jelly jar when it's baked right in!
Overall, these were super-tasty.  The key is to eat them in moderation.... not four in a row (I'm not addicted... I can quit anytime I want...) I did fairly well with these, bringing just one at a time in for a mid-morning snack at work, with another one alongside a cup of tea for an after-dinner snack.  Reasonable, right?  Right??

Thinking she'll use up more of that jam making her godmother's PB&J muffins...
-Honeybee

Sunday, January 30, 2011

Recipe Exchange!

Cinnamon-y goodness ahead!
 To be completely honest, I usually despise forwarded email "games" and chain letters.  If I don't know who my true friends are just by my interaction with them, I sincerely doubt that asking them to send me back a picture of a kitten professing undying friendship will clarify the matter.  Having said that, there are a few that I enjoy (usually when attempting to procrastinate, as I am now).  One of them is the recipe exchange.


This sounded like fantastic fun to me, and came from one of my coworkers.  ALMOST everyone I sent this to, however, declined to participate.  Most excused themselves on the grounds that they don't use recipes.  My dad sent my coworker his recipe for Kraft Dinner (at least she got a laugh!).  Only a few people gave it a go, but I still got a few yummy new ideas.  One, coming via my dear friend Andrea's mom, was for quick cinnamon buns.  Having spent quite a bit of time on some failure-to-rise sticky buns a few months ago, I appreciated this recipe using more of a baking-soda-leavened biscuit dough base:

Jiffy Cinnamon Rolls
From Barb Hoath (not sure of her original source)

Makes 12 buns 
  • 2 cups flour
  • 2 Tbsp sugar
  • 4 tsp baking powder
  • Dash salt
  • 1/4 cup cold butter
  • 1 cup milk
For Filling:
  • 1/3 cup softened butter
  • 1 cup brown sugar
  • 3 tsp cinnamon
  1. Preheat oven to 400ºF.
  2. "Crumble" butter into the dry ingredients (easier to accomplish with a pastry blender; I had to stick to the two knives technique.  You could try freezing and grating the butter, too)
  3. Add milk and mix all ingredients with a fork. 
  4. Roll out on a floured counter to a rectangle shape about 12" long by 8" width.
  5. Mix softened butter, brown sugar, and cinnamon for filling. Spread this mixture over the dough.
  6. Roll up dough from the 12" side and pinch 'seams'. Cut the rolled dough into 12 individual pieces. Place each piece in a greased muffin tin.  Bake at 400ºF for 20 minutes.
  7. Optional: glaze with 2 tbsp icing sugar mixed with 1 tbsp milk (I opted out of this; they're great on their own!)
Pre-oven... the dough was a bit sticky, but the end result was worth it!
Somewhat surprisingly, I actually received a number of other recipes.  I have yet to try these, so there are no pictures, but I'm happy to share them with you:


Cream Cheese Brownies
Sent by Sheri Moore, originally from 'Cookies and Brownies' by Alice Medrich

Makes about 16 - 2 inch squares.
Brownie Layer:
  • 1/2 cup (113 grams) unsalted butter, cut into pieces
  • 4 ounces (115 grams) unsweetened chocolate, coarsely chopped
  • 1 1/4 cups (250 grams) granulated white sugar
  • 1 teaspoon pure vanilla extract
  • 2 large eggs
  • 1/2 cup (65 grams) all purpose flour
  • 1/4 teaspoon salt 
Cream Cheese Layer:
  • 8 ounces (227 grams) cream cheese, at room temperature
  • 1/3 cup (65 grams) granulated white sugar
  • 1 teaspoon pure vanilla extract
  • 1 large egg
  1. Preheat oven to 325ºF (160ºC) and place the rack in the center of the oven. Have ready a 9 x 9 inch (23 x 23 cm) square baking pan that has been lined with aluminum foil across the bottom and up two opposite sides of the pan.
  2. In a stainless steel (heatproof) bowl placed over a saucepan of simmering water, melt the butter and chocolate. Remove from heat and stir in the sugar and vanilla extract. Add the eggs, one at a time, beating well (with a wooden spoon) after each addition. 
  3. Stir in the flour and salt and beat, with a wooden spoon, until the batter is smooth and glossy and comes away from the sides of the pan (about one minute). 
  4. Remove 1/2 cup of the brownie batter and set it aside. Place the remainder of the brownie batter evenly onto the bottom of the prepared pan.
  5. Then, in the bowl of your food processor (or with a hand mixer), process the cream cheese until smooth. Add the sugar, vanilla, and egg and process just until creamy and smooth. 
  6. Spread the cream cheese filling evenly over the brownie layer. Spoon small dollops of the reserved brownie batter evenly on top of the cream cheese filling. Then with a table knife or wooden skewer, swirl the two batters without fully mixing them.
  7. Bake in the preheated oven for about 25 minutes or until the brownies start to pull away from the sides of the pan and the edges of the brownies are just beginning to brown. Remove from oven and place on a wire rack to cool. 
  8. Refrigerate the brownies until they are firm enough to cut into squares (at least two hours). Once chilled, remove the brownies from the pan by lifting with the ends of the foil and transfer to a cutting board. With a sharp knife, cut into 16 squares. It is a good idea to have a damp cloth nearby to wipe your knife between cuts. 
  9. These brownies can be stored in the refrigerator for several days.

Apple or Rhubarb Cake
From Grandma Mary of the Morris Family

Makes about 9 pieces, judging by how I cut a 9"x9" cake

  • ½  cup butter
  • 1½ cup sugar
  • 1 egg
  • 1 tsp vanilla
  • 2 cups flour
  • 1 tsp baking soda
  • Pinch salt
  • 1 cup sour milk or buttermilk (add a tablespoon of white vinegar or lemon juice to a cup of milk if you don't have buttermilk)
  • 2 cups diced rhubarb or apples (blueberries also work well!)
  1. Preheat oven to 350ºF.
  2. Mix as you would any cake; wet ingredients first, then mix in dry ingredients.  
  3. Fold in apples or rhubarb and place in buttered 9X9 pan.  
  4. Mix ⅓ cup sugar and 1 tsp cinnamon.  Sprinkle on top of cake before baking at 350ºF for 25-30 minutes. 

Roasted Pepper and Goat Cheese Baguette
From the McCormacks (not sure of original source, but I really want to try this!!)

Makes 1 loaf
  • 1 loaf of French bread
  • Goat cheese or Feta (enough to spread over the insides of the loaf on both sides)
  • 1 red pepper
  • 1 yellow pepper
  • Fresh basil leaves ( 1 package should be good)
  • Olive oil
  1. Split bread lengthwise into two long halves.
  2. Cover both sides with cheese and lay basil leaves on top of cheese
  3. Thinly slice peppers and cook the in a skillet with olive oil until tender
  4. Spread sliced peppers inside the loaf
  5. Close loaf and compress; wrap tightly in foil if taking to a party
  6. Slice 1 inch pieces with bread knife and serve!
Ed. note: This sounds delicious; when I make it, though, it'll probably be comprised of actual charred roasted peppers, mixed with sautéed onions and garlic in olive oil.  I would also probably pop the foil wrapped loaf in a 350ºF oven for about 20 min. to heat through before slicing.  But that's just me!

So despite my distaste for email "games", I think I really benefited from this one.  It was a bit strange to be getting emails from people I'd never met before, but I think that just lends more evidence to my belief that food is a universal unifier.

Hoping to share another community food event with you before the weekend is out,
-Honeybee

Sunday, October 3, 2010

Sunday Cranberry Apple Oatmeal Pancakes


 Some mornings just call for a large, pampering breakfast.  For example, the morning after the consumption of a bottle of wine at a dubious “wine bar” and copious amounts of dancing at Gio’s… thankfully pancakes seem to have anti-vino-hangover-headache properties for me.  Huzzah.


Normally, I cure hangovers with a super-greasy bacon-and-eggs breakfast… but I already felt bad enough about myself, so I reached (yes, AGAIN) for my G.I. Diet Clinic’s recipe for oatmeal pancakes and fiddled with it a bit.  I’ve made these pancakes before… the only downside is the 20-minute oat-soaking time period.  But, just get them soaking, make some coffee, prep the rest of the ingredients, and feed your cats… it doesn’t take much extra time overall.  Undoctored, these are delicious, but they needed some oomph for me this morning.  I accomplished this “thusly”, as Alton would say:


Oatmeal Cranberry Apple Pancakes
Adapted from “The G.I. Diet Clinic” by Rick Gallop
(Seriously, I hope he doesn’t sue me)

Makes five respectable-sized pancakes… which is supposed to be 2 servings for those without hangovers.  One serving for those suffering for their EtOH transgressions.

  • A generous 1/3 cup large-flake oats
  • 1 cup buttermilk
  • ½ cup whole wheat flour
  • 1/8 cup (or 2 tbsp) ground flaxseed
  • ½ tbsp Splenda
  • ½ tsp ground cinnamon
  • ½ tsp baking powder
  • ½ tsp baking soda
  • Pinch salt
  • 1 Omega-3 egg
  • 1 tbsp canola oil
  • ½ tsp vanilla
  • ¼ of a large apple, peeled and chopped
  • ¼ cup dried cranberries
  1. In a 2-cup measuring cup, soak oats in buttermilk for 20 minutes
  2. In large bowl, combine flour, flaxseed, Splenda, cinnamon, baking soda, baking powder, and salt.
  3. When the 20 minutes is up, whisk the egg, oil, and vanilla into the buttermilk-oats mixture.  Pour over flour mixture and stir until just mixed.  Add the apple and cranberries and stir just to incorporate.
  4. Meanwhile, heat non-stick griddle or large non-stick frying pan over medium heat.  Give it a quick spritz of non-stick spray oil.  Ladle about a half of a soup-ladle’s worth of batter onto the griddle for each pancake.  Cook until bubbles appear on top, edges are starting to brown, and the top has almost completely lost its shiny “uncooked” sheen (about 3 minutes or so)
  5. Flip pancakes and cook for another minute or two until golden.  Transfer to a plate and devour. 
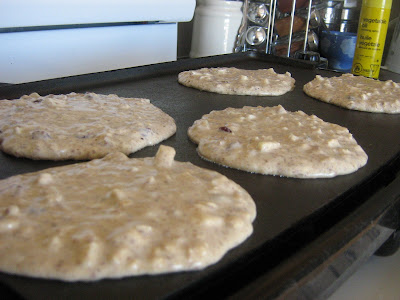
I call this piece, "As the Pancake Turns".  But is it art? ;)
These doctored pancakes are probably okay in the G.I. world, but what I did to them next most definitely is NOT:


That’s right.  Margarine and table syrup.  It’s not even light syrup, which tastes gross to me.  I was tempted to buy the “diabetic” pancake syrup in the store, but I couldn’t justify spending twice the amount of money for half the amount of product.  It’s also not maple syrup, which is incredibly expensive and, in my opinion, too runny.  My mom always bought a huge jug of No Name table syrup for family pancake mornings, and if it was good enough for her, it’s more than good enough for me.  Blood sugar levels be damned!! (Well, for me.  No disrespect to those for whom monitoring this level is serious business).


The combination of a warm, sunny (if windy!) fall morning combined with these delicious pancakes chased away the blahs of overindulgence from the night before.  A great start to a gorgeous Sunday.

Wishing that all pancakes could be considered healthy,
-Honeybee

Sunday, September 26, 2010

Outrageously overboard oatmeal


I've been really enjoying this whole blogging adventure so far.  However, I think I might be coming off as a touch obsessed to those nearest and dearest to me.  Case in point: I finished prepping a simple meal while talking to Hubs via Skype.  I sat down to eat it, and he promptly shouted, "WAIT!!!"  Utensil already halfway to mouth, I shot him a curious look... to which he jokingly inquired, "Aren't you going to take pictures of it first?!"  If memory serves, it was mac and cheese.  Not exactly blog-worthy... but sadly, the thought HAD crossed my mind even before Hubs interjected.  Am I just dedicated?  Slightly obsessed?  Who knows?  And to borrow Hubs' life philosophy, who cares?!


Anyhow, I opened with that little interlude because the oatmeal I made reminded me of it.  I mean, really, what's so special about oatmeal?  Why blog about it?  Well, two things.  One: I feel as though making homemade, not-from-quick-cook-oats, honest boiled-on-the-stovetop oatmeal is going the way of the dodo.  Why go to the trouble when it's so easy to hit up Quaker for an instant single-serving pouch of pre-flavoured hot cereal?  Two: The G.I. Diet cookbook has a good and simple recipe, I was out of cold cereal, and I had a bunch of fruit and nuts that I thought might combine together nicely.  This led me to making a giant bowl oatmeal a few weekends ago.  The base recipe is G.I. friendly, but I doctored it up with a few extra ingredients.  Therefore, I do not recommend its use for weight loss purposes... just for delicious breakfasts.  Read on!

Homey Strawberry-Apple-Hazelnut Oatmeal
Adapted from "The G.I. Diet Clinic" by Rick Gallop
Makes one gigantic bowl (technically two servings)
  • 1 cup skim milk
  • 3/4 cup water
  • 1/2 tsp ground cinnamon
  • 1/4 tsp salt
  • 2/3 cup large-flake whole oats (not quick-cooking or rolled oats; read carefully!)
  • 1/8 cup (or 2 tbsp) wheat germ
  • 1/8 cup (or 2 tbsp) chopped hazelnuts
  • About 1/4 cup frozen strawberries
  • About 1/4 of a large apple, peeled and diced
  • 1 tbsp honey
  • 1 tsp vanilla extract
  1. In large pot, bring milk, water, cinnamon and salt to boil.
  2. Stir in oats and wheat germ and return to boil.
  3. Reduce heat to low.  Add strawberries, apple and vanilla.
  4. Cook, stirring, for about 8 minutes or until thickened.
  5. Stir in hazelnuts and honey.  Let cool slightly and serve.

I'm not really sure what possessed me to add all of those flavours into one bowl, but it worked.  Obviously, you can doctor this by adding any type of nut or fruit you so desire.  I usually just throw in a handful of dried cranberries or raisins, along with some rough-chopped almonds.  The original recipe calls for Splenda instead of honey, to make it G.I.-friendly, so that's an option too.  If you're trying for healthy, though, remember to split the quantities in half here; my recipe makes enough for two people.

An important point, before I go: I'm not meaning to knock instant oatmeal.  I was practically raised on the peaches-and-cream and maple-and-brown-sugar Quaker varieties.  Mmm.  But, I know how loaded with sugar those can be; and honestly, it doesn't take that much longer to make homemade oatmeal (as a former coworker pointed out).  You can even make this by combining all the ingredients in a medium sized bowl and popping it in the microwave for about five minutes, stirring every so often... the only concern is that sometimes it boils over and makes a mess in your appliance (hence why I recommend a larger bowl).

This isn't actually a cereal bowl; it's a medium-sized mixing bowl.  This was a VERY hearty portion.
Hoping I've inspired some of you to return to a simpler time of homemade porridge,
-Honeybee